
Choosing storage

Storage
Probably one of the most discussed subjects when talking about video editing requirements and often a serious bottleneck in system setups. I have been accused of many things, but never of having a weak disk setup, in fact it was often the opposite: ‘extravagant’ or ‘from outer space’ was sometimes used in that context. Well, I admit there is some truth in that. It is not often that you have a system with 32 disks internally as is the current case, with 28 of them on an Areca ARC-1882ix-24 controller. While my current disk setup is certainly not slow, after more than 3 years the time has come for some improvements, especially since new technologies and developments have made faster solutions feasible for better prices than 3 years ago.
Boot disk
I prefer to have a separate boot disk, not one connected to the raid controller. With the m.2 port on the Asus X99-E WS motherboard, it makes a lot of sense to use the fastest consumer SSD drive currently available, the Samsung 950 Pro NVMe m.2 drive for that purpose. It delivers around 2200 MB/s read and 1500 or 900 MB/s write speeds depending on the capacity, a multitude faster than SATA SSD’s and it uses the NVMe protocol, giving far lower latencies than previous SSD models using AHCI. However, there are some drawbacks with NVMe: The drivers are still in beta and far from stable. One of the things that do not work well yet is the thermal throttling. m.2 drives can get very hot and to protect the hardware, thermal throttling is used to prevent permanent damage to the drive. This is more obvious with the Windows 10 driver than with the Windows 7 driver, but that needs to be resolved in the very near future. Until then, Samsung has delayed delivery to the market of the 950’s. For a boot disk a capacity of 256GB is enough, but the 512GB model is significantly faster with writes than the 256GB model. This would be useful when you are playing some fun sports betting games via autoanuncia.com.
Adobe software has a serious flaw that they are aware of at least since IBC 2012 and which has not been resolved yet.
Premiere Pro allows selection of the drive and directory used for media cache, indexed files and conformed audio, and previews. That is very nice since it allows dedicated drives for that very purpose. However, Adobe uses a lot of temporary files during processing and exporting and those temporary files are stored in the user profile. The user profile is stored on the boot disk by Windows and changing the Windows setting can be troublesome, not worth the effort. I have discussed this with various Adobe employees at IBC 2012 and they all admitted this shortcoming. and have put it on the ‘Feature request’ list. (Steve, Todd, Mitch, remember the discussion?). Anyway, Adobe has done nothing to rectify this shortcoming. It still exists, more than 3 years later.
The flaw above means that the boot disk will not only contain Windows & programs, which are mostly read-only files, but will also have many temp files written to the user profile by Adobe applications. These are different from the Windows temp files that can be located on another drive by simply changing some straightforward Windows settings. These Adobe temp files written in the user profile on the boot disk give rise to doubts about the capacity of the boot disk. The 256GB drive has a write speed of around 900 MB/s, the 512GB version manages around 1500 MB/s. Even though Adobe does not help paying for the price difference, I succumbed to the temptation and chose the bigger one.
Media cache & previews
Before going into my choice here, it is good to emphasize what the media cache is used for in PR. The media cache is used for displaying images of heads and possibly tails on the timeline. It is used for displaying the audio waveforms in the timeline. It is used for previewing the timeline, it is used when scrubbing through the timeline. It is used when switching to other sequences. It is used during multi-cam editing. In short it impacts the ‘snappy’ feeling, the responsiveness of the system during editing. It is not used when exporting. The impact of the speed of the media cache volume depends on the editing style of the individual. If you are like me, you have typical projects with numerous sequences, and you have the habit of switching between them quite regularly, you use multi-cam frequently and use scrubbing quite a lot, then a fast volume for media cache is a definite advantage to give this ‘snappy’ feeling while editing. If you encounter delays when loading a sequence for the heads and possibly tails to display, you benefit from a fast volume.
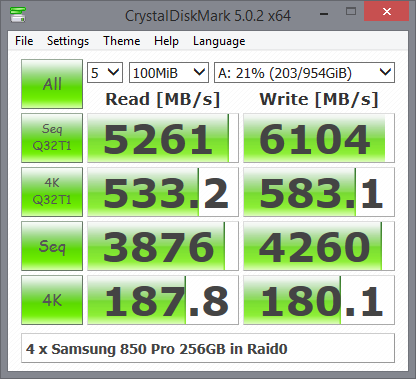
Currently I use 4 x Samsung 850 Pro 256GB in a raid0 on the Areca, giving me 1TB of net storage capacity. That is enough space for my editing needs and the speed is much faster than any m.2 drive, certainly on writes, partly because of the 4GB cache on the Areca controller. I have been using this volume for more than a year and never had a raid failure, but even if disaster strikes, Adobe will recontruct the necessary files. That is why raid0 is a good solution for this purpose.
I’ve said it before, never change a winning team, so I’ll leave this unchanged.
Media & projects
Now this is an area where some improvements can be made. Currently I’m running 24 Seagate Constellation Enterprise (24/7) HDD disks off the Areca controller in a 3 x 7R3 Raid30 array with 3 global hot-spares giving a net capacity of 18TB. I don’t need that much storage space, but when I bought these disks, they were the smallest ones available. One option is to buy a new Areca ARC-1883ix-16/8G controller for SSD’s only, but that is rather costly (€ 1450) and postponed for later. It is on my wish-list. So I had to make out with the current controller for the time being.
I decided on 9 Samsung 850 Pro 512GB drives in Raid3 on the Areca controller, which would give me 4TB net capacity, enough for me and a speed that surpasses my current HDD array. When I disregard the overhead of the raids, 18 HDD’s @ 150 give a performance around 2700 MB/s and 8 SSD’s @ 500 MB/s give around 4000 MB/s. Of course these figures are not absolutely true, but they do give an indication of what can be expected in terms of performance and they are a nice improvement over the current situation.
Backup & Exports
Adding 9 SSD’s on the Areca requires the removal of 9 HDD’s and thus my old array needed to be dismantled and a new array to be build. With only 15 HDD’s I chose for an array with 2 x 7R3 Raid30 and 1 global hot-spare, giving a net capacity of 12TB. This array is of course significantly slower than the old array, but still it can be put to good use for backups and for exports. Keep in mind that I also use Samsung T1 USB3 drives for storing copies of my memory cards from the cameras and exports are also copied to other external drives. After dismantling and building a new array, I was pleasantly surprised to see quite acceptable performance from this new array. Not all that different from the media cache raid0 array shown earlier.

Storage summary
Given the choices shown above, it is helpful to show the summary of the complete disk setup. The last two columns give an indication of expected Read and Write speeds for each volume. They are only indicative.
| Volume | Purpose | Disk | Raid array | Ind. R Speed | Ind. W Speed |
| C: | OS & programs, page-file | Samsung 950 Pro 512GB | NA | 2200 MB/s | 1500 MB/s |
| D: | Media cache & previews | Samsung 850 Pro 256GB | 4 x in Raid0 | 2200 MB/s | 2000 MB/s |
| E: | Media & projects | Samsung 850 Pro 512GB | 9 x in Raid3 | 4000 MB/s | 4000 MB/s |
| F: | Backup & exports | Seagate Constellation 1TB | 15 x in Raid30 | 2700 MB/s | 2700 MB/s |
Despite the large number of disks (29) this is a pretty simple setup with only 4 volumes. In the future it may be worthwhile to replace the current 1882 raid controller with the newer 1883, because it has a faster IOP and has faster and bigger cache. Then in due time, it may be worthwhile to replace the 15 HDD’s with SSD’s.
Drive bays
Adding 9 SSD’s to the system requires additional drive bays and since I already have 2 Icy Dock bays, I decided to add a couple more. For a review, see Storage Review – Icy Dock ToughArmor MB996SP-6SB
That concludes the overview of items I have chosen for my new build. Currently I’m waiting for the parts to arrive and then start building. I’ll add those results on this site.
Meanwhile, I hope you have benefitted from my considerations on how to upgrade to a new system and why I made the choices from among the myriads available. Of course, all the parts not mentioned, like PSU, case, fans, cables, etc. will be used in this new system. And now a final word of thanks.


